How We Thin Overgrown Hostas and Refresh Garden Edging
Learn how we thin and divide overgrown hostas and replace tired plastic edging to give garden beds a fresh, clean look that lasts.
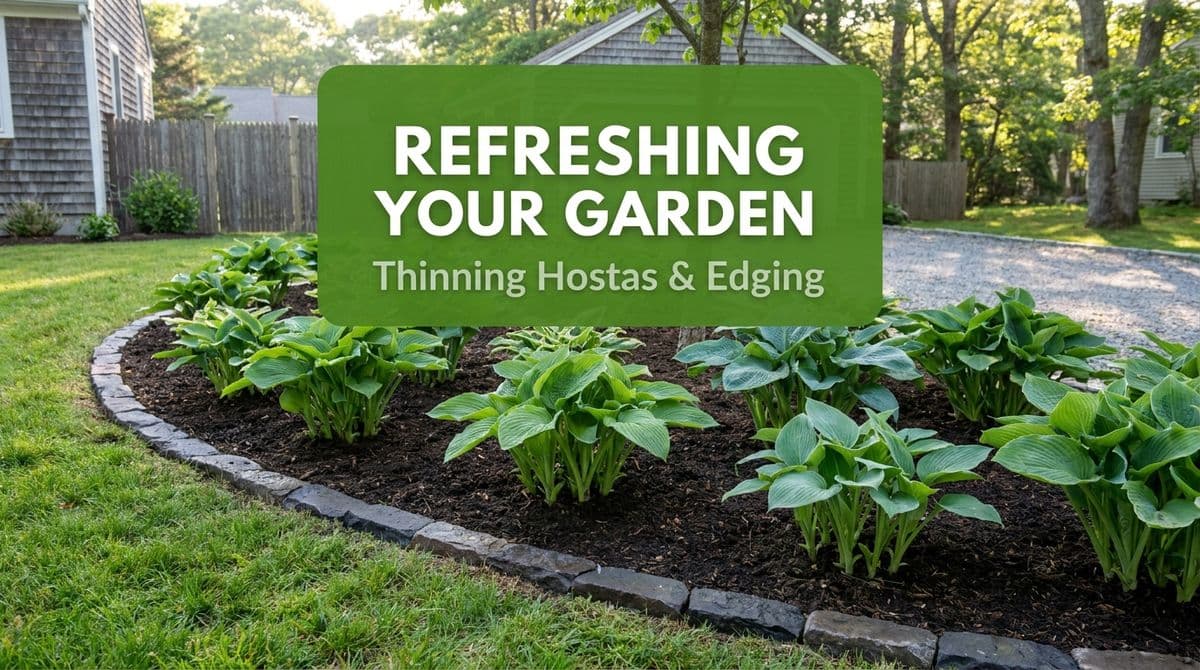
When Hostas Take Over: A Real-Life Garden Refresh
We recently got a call from a customer — let’s call her Carol — who sounded a lot like many of the homeowners we talk to every spring.
Carol’s front beds were packed with beautiful, mature hostas that had slowly turned into solid green clumps. On top of that, her old black plastic landscape edging was popping up, broken in a few spots, and she had already bought new edging but didn’t feel confident installing it herself.
Her question was simple: “Can you thin out the hostas and replace this edging without ruining the plants or the look of the bed?” We walked her through our process and scheduled a visit, but her questions are the same ones we hear all the time — so we thought we’d share how we approach thinning and dividing hostas while refreshing garden edging.
How to Tell When Your Hostas Need Thinning
Hostas are tough, long-lived perennials. Over time, though, they slowly crowd themselves and the bed around them. When Carol described her situation, a few clues told us it was time to divide:
- Very tight clumps with dozens of shoots jammed together
- Smaller leaves than in past years
- Centers of the clumps thinning out or looking bare
- No breathing room between plants — just a solid mass of foliage
If you’re seeing the same thing, it’s probably time to thin and divide. A good rule of thumb: most hostas benefit from division every 4–6 years, depending on variety and growing conditions.
Best Time of Year to Divide Hostas
When Carol called, her biggest worry was, “Am I going to shock or kill them if we do this now?” The timing matters, but hostas are forgiving.
We generally recommend:
- Early spring: When shoots are just emerging and only a few inches tall. Easiest on the plants.
- Early fall: When temperatures cool and plants are starting to wind down.
You can divide hostas in mid-season if needed; you’ll just want to water more consistently and expect them to look a bit stressed for a short time.
Tools You’ll Need for Thinning and Dividing
For Carol’s project, we used the same basic kit we recommend to homeowners:
- Spade or sharp shovel
- Hand trowel
- Sturdy garden knife or pruning saw
- Bucket or tarp for extra divisions
- Compost or composted manure
- Mulch
Make sure blades are sharp and reasonably clean; a clean cut heals faster and is less likely to spread disease.
Step-by-Step: How We Thin and Divide Hostas
Here’s the same process we walked through on Carol’s property, broken down so you can follow it at home.
1. Prep the Area
Water the day before if the soil is dry. Moist soil is easier to dig and less stressful on roots. Clear away loose mulch so you can see the edges of each clump.
2. Dig Up the Clump
We start a few inches outside the visible foliage, just like we did for Carol:
- Sink your shovel straight down in a circle around the plant.
- Gently pry up the entire root ball.
- Lift it onto a tarp or open area so you can work comfortably.
Try not to stab through the center of the plant — the goal is to bring up as many roots as possible.
3. Separate Into Divisions
This is where Carol was most nervous: “How do I know how small to cut them?” Our guideline:
- Look for natural “sections” of shoots and roots.
- For a full-sized hosta, aim for 3–5 eyes (shoots) per division.
- Use a sharp knife or spade to cut the clump into wedges like a pie.
Don’t worry if some roots break; hostas are resilient. Just avoid making tiny single-shoot pieces unless you specifically want baby plants.
4. Replant at the Right Spacing
With Carol’s bed, part of the problem was spacing — the hostas had been allowed to expand until there was no definition along the edging.
When replanting:
- Mix compost into the planting area for a nutrient boost.
- Plant divisions at the same depth they were growing before.
- Space them so mature plants will just touch but not smother each other. For most medium hostas, that’s 18–24 inches apart.
Set aside any extra divisions you don’t need in that bed — they’re perfect for filling other shady spots or sharing with neighbors.
Refreshing Your Garden Edging While You’re At It
In Carol’s case, thinning the hostas was only half the project. Her existing black plastic edging was heaving out of the ground and no longer doing its job of holding mulch and defining the bed line. She had already purchased new plastic edging and wanted to know if we could reuse the same line or if we needed to reset it.
1. Remove Old Edging
We started by carefully pulling up the old edging:
- Loosen soil along both sides with a trowel.
- Gently lift the plastic, watching for roots that have grown over it.
- Remove any old stakes or connectors.
If tree roots have pinned the edging down, cut small sections instead of forcing one long pull.
2. Set a Clean, Smooth Bed Line
Before installing Carol’s new edging, we redefined the curve of the bed. This is where a professional touch can really improve curb appeal:
- Use a garden hose to “draw” a gentle curve you like.
- Cut along that line with a spade to create a crisp edge.
A smooth, flowing line looks better than a wiggly one that chases each plant.
3. Install the New Plastic Edging
With the line set, we installed the edging Carol had purchased. Here’s the basic approach:
- Dig a shallow trench along the new bed line, deep enough so only the top 1/2 inch of edging will show.
- Set the edging in the trench, keeping the top edge level and the curve smooth.
- Use stakes or spikes every few feet and at all joints.
- Backfill firmly on both sides and tamp the soil.
Keeping just a little of the edging visible gives a neat look while still holding mulch in place.
Tying It All Together: Mulch, Water, and Aftercare
Once Carol’s hostas were thinned and the new edging was in, the last step was finishing the bed so it would stay healthy and tidy.
- Mulch: Add 2–3 inches of mulch, keeping it pulled back slightly from the hosta crowns and the edging.
- Water: Give everything a deep soak right after planting. For the next couple of weeks, keep the soil consistently moist (but not soggy) as divisions re-establish.
- Trim: If any leaves were badly damaged during division, trim them back so the plant can focus on root growth.
Within a season, Carol’s beds looked fuller but cleaner, with defined lines and happier plants — and she didn’t lose a single hosta.
When to DIY and When to Call Us
Hosta division and edging replacement are absolutely doable as a DIY weekend project if you’re comfortable digging and working with a shovel. Where homeowners like Carol often call us in is when:
- The beds are large or densely planted.
- Edging lines need to be redesigned for better curb appeal.
- They want everything done quickly and cleanly in a single visit.
If your hostas are taking over and your edging is failing, we’re always happy to stop by, take a look, and either handle the work for you or walk you through a plan that fits your yard.